STANTON SCS.1d
SETUP
Firmware & Drivers
Drivers : Install the latest ASIO drivers (Windows only) from http://www.stantondj.com/stanton-controllers-systems/scs1d.html
Firmware : Update the firmware of the unit to the latest version from http://www.stantondj.com/stanton-controllers-systems/scs1d.html
VirtualDJ Setup
Once VirtualDJ 8 is opened, a window will appear to login with your Account credentials.
A Pro Infinity or a Subscriber License is required to use the Stanton SCS1d. Without any of the above Licenses, the controller will operate for 10 minutes each time you restart VirtualDJ 8.
http://www.virtualdj.com/buy/index.html

The unit is now ready to operate.
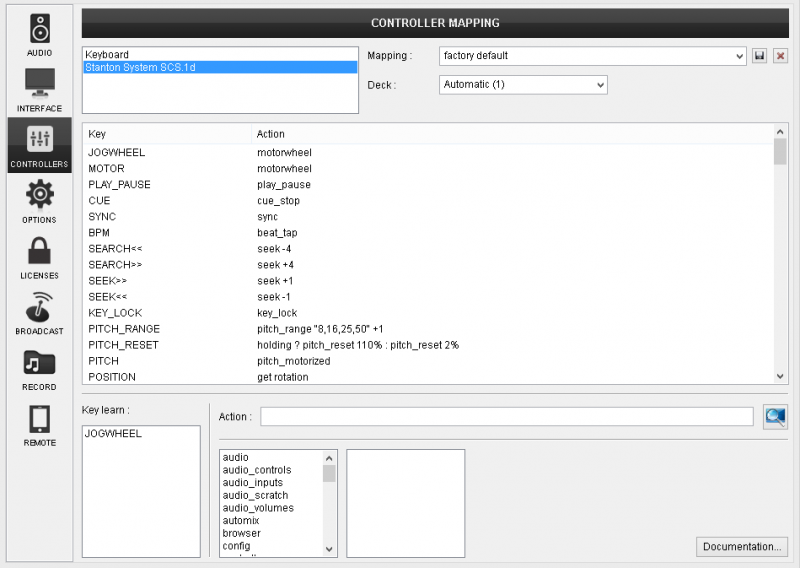
MIDI Operation
The factory default Mapping offers the functions described in this Manual, however those can be adjusted to your needs via VDJ Script actions.
Find more details at
http://www.virtualdj.com/wiki/VDJ8script.html
AUDIO Setup
The unit is not offering a built-in audio interface (sound card), therefore no special button for the Stanton SCS1d with pre-defined audio configuration will be offered in this tab.
By default VirtualDJ will use the built-in sound card of your computer, but customized audio setups can be manually applied (see Audio Setup in VirtualDJ 8 manual)
For further VirtualDJ settings and features please refer to the User Guides of VirtualDJ 8.
http://www.virtualdj.com/manuals/virtualdj8/index.html
CONTROLS
A See Hotcues & Loops section
B See Effects & Browser section
C See Sampler section
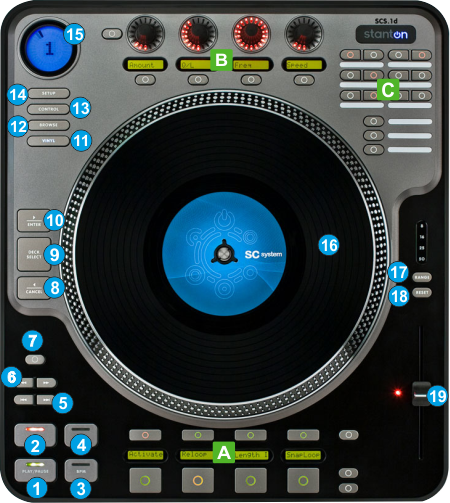
- PLAY. Plays / Pauses the track.
- CUE. When the Deck is paused, you can set a Cue Point by moving the Platter to place the Audio Pointer at the desired location and then pressing the Cue Button.
During playback, you can press the Cue Button to return the track to this Cue Point. (If you did not set a Cue Point, then it will return to the beginning of the track.).
If the Deck is paused, you can press and hold the Cue Button to play the track from the Temporary Cue Point. Releasing the Cue Button will return the track to the temporary Cue Point and pause it. To continue playback without returning to the Temporary Cue Point, press and hold the Cue Button, then press and hold the Play Button, and then release both buttons. - BPM. Use this button to manually tap the tempo of the track (in case the BPM is inaccurate). Tap at least 4 times in order VirtualDJ to auto-calculate the tempo of the track. While track is paused, tap once to set the current position as the 1 beat of the 4beat Beatgrid.
- SYNC. Press this button to automatically match the corresponding Deck's tempo with the opposite Deck's (or the Master Deck’s if using a 4 decks Skin) tempo and phase.
- FAST SEARCH. Use these buttons to move the loaded track forward/backwards by 4 beats (fast seek).
- SEARCH. Use these buttons to move the loaded track forward/backwards by 1 beats (seek).
- KEYLOCK. Press this button to "lock" the track's pitch to its original key. The track's tempo will remain at the speed designated by the Pitch Fader.
- CANCEL. Press this button to unload the track from the selected deck.
- DECK SELECT. Use this button to cycle and select the next available deck as selected. The number of the available decks depends on the number of the connected midi devices, the decks that each one can control and the decks of the loaded skin (VirtualDJ will choose the largest number)
- ENTER. Load the selected track from the Browser to the selected deck.
- VINYL. Press this button to set the Jogwheel to Vinyl (Scratch) mode or CD (Bend) mode. In Vinyl mode, use the outer part of the Jogwheel to bend (temporary speed up – slow down the tempo of the track) and the inner touch-sensitive part to scratch. In CD mode (Vinyl mode off), the motor will not operate and the jogwheel can only be used to pitch bend.
- BROWSE. Press this button to set the upper FX encoders (A) to Browser mode. See Effects & Browser.
- CONTROL. Press this button to set the upper FX encoders (A) to FX mode (default mode). See Effects & Browser
- SETUP. If the 2 decks default skin of VirtualDJ 8 is used, press this button to cycle through the available side panels for the selected deck (HotCues, Loops and Effects)
- DECK LCD. The LCD display will show the selected/controlled deck of the unit and a pointer to show the position of the track. The same circle pointer will blink if the track reaches the end.
- JOG. Motorized platter.
- RANGE. Press this button to select the next available range for the Pitch Fader (available values ±8%, ±16%, ±25% and ±50%).
The Leds above this button will indicate the selected pitch range. - RESET. Press this button to smoothly reset the pitch to its zero position. The Led of this button will blink while pitch is resetting,
- PITCH. Adjust the track's playback speed (tempo). The motorized pitch fader will follow the value of the software pitch and vice versa. The red led right next to the pitch fader will be on if the pitch is at the zero position.
Hotcues & Loops
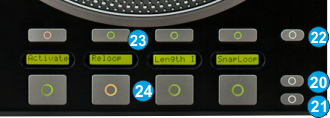 The 4 large (24) and the 4 smaller (23) buttons of this section offer HotCues and Loop functions depending on the selected mode.
- LOOP MODE. Press this button to set the 8 buttons to Loop mode. The led of this button will turn on to indicate the selected mode. Press the same button again to set the 8 buttons to HotCue mode (default).
- SAVED LOOP MODE. Press this button to set the 8 buttons to Saved Loop mode. The led of this button will turn on to indicate the selected mode. Press the same button again to set the 8 buttons to HotCue mode (default).
- INFO LCD. Use this button to change the displayed info in HotCue mode for the 4 LCD displays. The LCD displays can offer Cue Name, Cue Time, time from Cue and Beats to Cue information.
- SMALL BOTTOM (1-4) These 4 buttons offer different functions depending on the selected mode.
In HotCues mode, use these buttons to delete the assigned HotCue points (1 to 4).
In Loop mode, use these buttons to select one of the available 4 Loop sub-modes (Manual, Edit, Quick Loop, Loop Roll)
In Saved Loop mode, use these buttons to delete the saved Loop. - LARGE DOWN (1-4). These 4 buttons offer different functions depending on the selected mode.
In HotCues mode the 4 buttons assign a Hot Cue Point (1 to 4) or returns the track to that Hot Cue Point. When a Hot Cue Button is unlit, you can assign a Hot Cue Point by pressing it at the desired point in your track. Once it is assigned, the Hot Cue Button will light. To return to that Hot Cue Point, simply press it.
The LCD will display ‘NO CUE’ if no HotCue is assigned to this button and other information depending on the info mode (22) button
In Loop mode use the 4 upper buttons to select the Loop sub-mode.
If the 1st small button is selected (Manual Loop sub-mode), use the 1st button from left to set an Entry Loop (Loop In) point. The 2nd from left will set the Loop Exit (Loop Out) point. Use the 3rd button from left to trigger a loop of a preselected size or exit the Loop. Use the 4th button to trigger the last used loop (Re-loop)
If the 2nd small button is selected (Edit Loop sub-mode), use the 1st button from left to half the size of the loop and the 2nd from left to double its size. Use the 3rd and 4th buttons to move the triggered loop by 1 beat backwards or forward.
If the 3rd small button is selected (Quick Loop sub-mode), use these buttons to trigger a pre-defined quick loop of 1, 2, 4 or 8 beats
If the 4th small button is selected (Saved Loops sub-mode), use the buttons to trigger a momentary loop roll of 1/8, ¼, ½ or 1 beats.
In Saved Loop mode use these 4 buttons to save the last used loop to an empty slot, or enable/disable (arm) the saved loop if saved.
The LCD displays above each button will show the assigned action depending on the selected mode or sub mode.
Effects & Browser
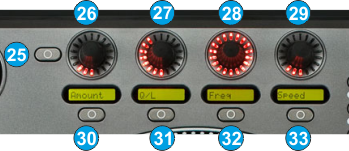 The top 4 encoders, along with the lower 4 buttons, offer Effect and Loop or Browser controls, depending on the selected mode (using buttons 12 and 13).
The LCD displays will show the assigned action depending on the selected mode.
- LCD COLOR. Use this button to select the background color for the top LCD displays (green, orange or red).
- ENC1.
In Effects mode, use this encoder to select the Effect for this deck. The name of the selected effect will be displayed on the LCD below. Push the encoder to open/close the GUI of the selected Effect.
In Browser mode, use this encoder to scroll through folders. Push the encoder to open/close sub-folders (if available) - ENC2.
In Effects mode, use this encoder to adjust the 1st parameter of the selected effect. If the button below this encoder is turned on, use this encoder to adjust the 3rd parameter of the selected effect. The short name and the value of the effect parameter will be displayed on the LCD below. Push the encoder to open/close the GUI of the selected Effect.
In Browser mode, use this encoder to scroll through tracks in the Songs List. Push the encoder to load the selected track to the deck. - ENC3.
In Effects mode, use this encoder to adjust the 2nd parameter of the selected effect. If the button below this encoder is turned on, use this encoder to adjust the 4th parameter of the selected effect. The short name and the value of the effect parameter will be displayed on the LCD below. Push the encoder to open/close the GUI of the selected Effect.
In Browser mode, use this encoder to scroll through tracks (or samples) in the Sideview. Push the encoder to load the selected track from the Sideview to the deck. If focus in on the Sampler View, push the encoder to play the selected sample. - ENC4.
In Effects mode, use this encoder to half or double the size of a Loop. Push the encoder to toggle between the Size and the Move mode, and use the same encoder to move the triggered loop backwards or forward.
The LCD will display the size of the loop and the status (mode) of the Encoder in Loop Move mode.
In Browser mode, use this encoder to seek through the track loaded to the Prelisten Player Push the encoder start/pause the Prelisten Player. If the Prelisten Player is stopped, moving the encoder will also start the Prelisten Player. - FX BUT1.
In Effects mode, use this button to enable/disable the selected Effect.
In Browser mode, use this button to set focus to the Folders list - FX BUT2.
In Effects mode, use this button to define if the encoder ENC2 (27) will control the 1st or the 3rd Effect parameter.
In Browser mode, use this button to set focus to the Songs list - FX BUT3.
In Effects mode, use this button to define if the encoder ENC3 (28) will control the 2nd or the 4th Effect parameter
In Browser mode, use this button to set focus to the Sideview list. Hold this button for more than 1 second to open/close Sideview, then use this button to cycle though the available views of Sideview (Automix, Sidelist, Karaoke, Sampler and Clone) - LOOP BUT.
In Effects mode, press this button to enable/disable a loop of a pre-selected size
In Browser mode, hold this button down for more than 1 second to open/close the Info window of Browser (with the Prelisten Player). Use this button to start/stop the Prelisten Player.
Sampler
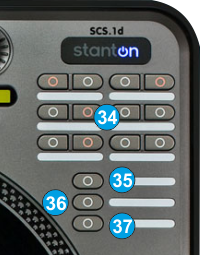
- SAM PADS. The 12 top buttons (34) trigger a Sample (1 to 12) from the selected Sampler Bank. The Led of each button will be on if the corresponding slot is loaded and will blink if the sample is triggered.
- SAM BANK. Use this button to select and load the next available Sampler Bank
- SAM MODE. Use this button to select the next available Sampler pad mode (on/off, hold, stutter or unmute)
- SAM VIEW. Use this button to open/close the Sampler View of the Sideview.
